ICT Decoded · Mitigation Blocks
What Is a Mitigation Block in ICT Trading?
By Steve H — reads every firm’s official rulebook, checks prices and codes daily, and maintains the Enigma Score · Methodology · Editorial policy · Last updated October 31, 2026
ICT concepts were created and are taught by Michael J. Huddleston, The Inner Circle Trader (X · YouTube). This lesson is FundedEnigma’s own summary, not affiliated with or endorsed by ICT.
In short: An ICT mitigation block is a breaker's shape without the sweep: the second swing stops short of the first, so no stops are taken, then price breaks the short-term swing between them. The block is the last opposite-close candles in that second swing, framed with bodies. It ranks below a breaker.
How to Spot a Mitigation Block (And Why It's Not a Breaker) | ICT Explained · 6:21 · published October 31, 2026 · part of the ICT Concepts Decoded playlist
Watch the video
The full video is embedded above this article: How to Spot a Mitigation Block (And Why It's Not a Breaker) | ICT Explained. This page is the written version, with every chart walked through step by step. Jump to any part of the video:
Key facts: mitigation blocks at a glance
| Term | What it is | How it is used |
|---|---|---|
| Bullish mitigation block | A W: low, high, higher low that never reaches the first low's sell stops, then a break up through the high; the last down-close candle(s) in the second low | A zone price may come back down into |
| Bearish mitigation block | An M: high, low, lower high that falls short of the buy stops, then a break down through the low; the last up-close candle(s) in the second high | A zone price may come back up into |
| Versus a breaker | A breaker's second leg takes the stops beyond the first extreme; a mitigation block's second leg stops short | A breaker ranks above a mitigation block |
| Framing | Bodies: highest open or close to lowest; wicks for reference | The block's two edges |
| Mean threshold | The 50% of the bodies | The middle of the block |
| Minimum size | A body zone of at least 2 ticks and 0.1 x the average candle range | Smaller is a line, not a zone |
| Retired | A body close beyond the far side | The block is done |
Last verified 2026-10-31. All charts below are real historical CME NQ futures data, shown in New York time.
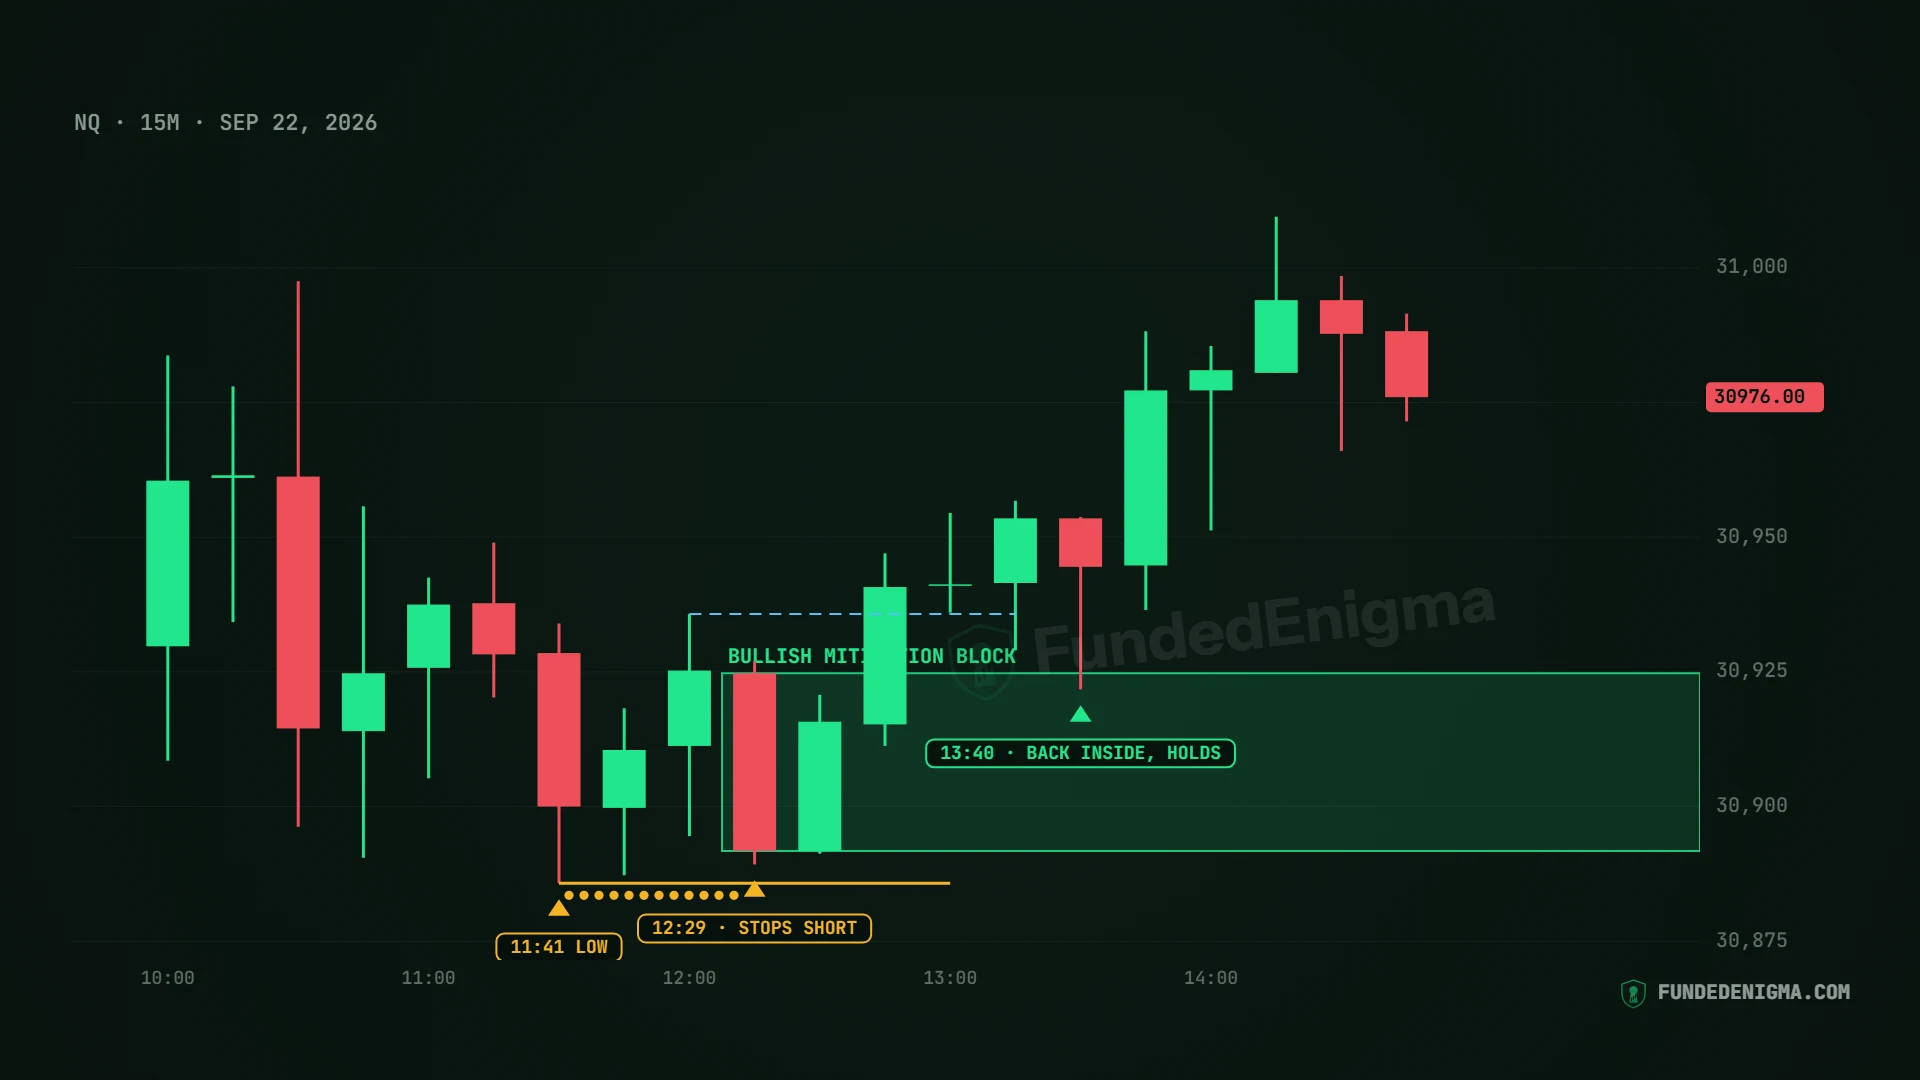
Here is the idea on one chart. On September 22, 2026, NQ made a low at 11:41. The next dip, at 12:29, stopped 3.5 points above it, so no stops were taken. At 12:48 price broke above the high between the two lows, and the down-close candle in the second low became a mitigation block. At 13:40 price dipped back into it and held.
How does a mitigation block work?
A mitigation block has the same shape as a breaker, with one thing missing: no liquidity is taken. Price fails to reach its last extreme, then breaks the short-term swing.
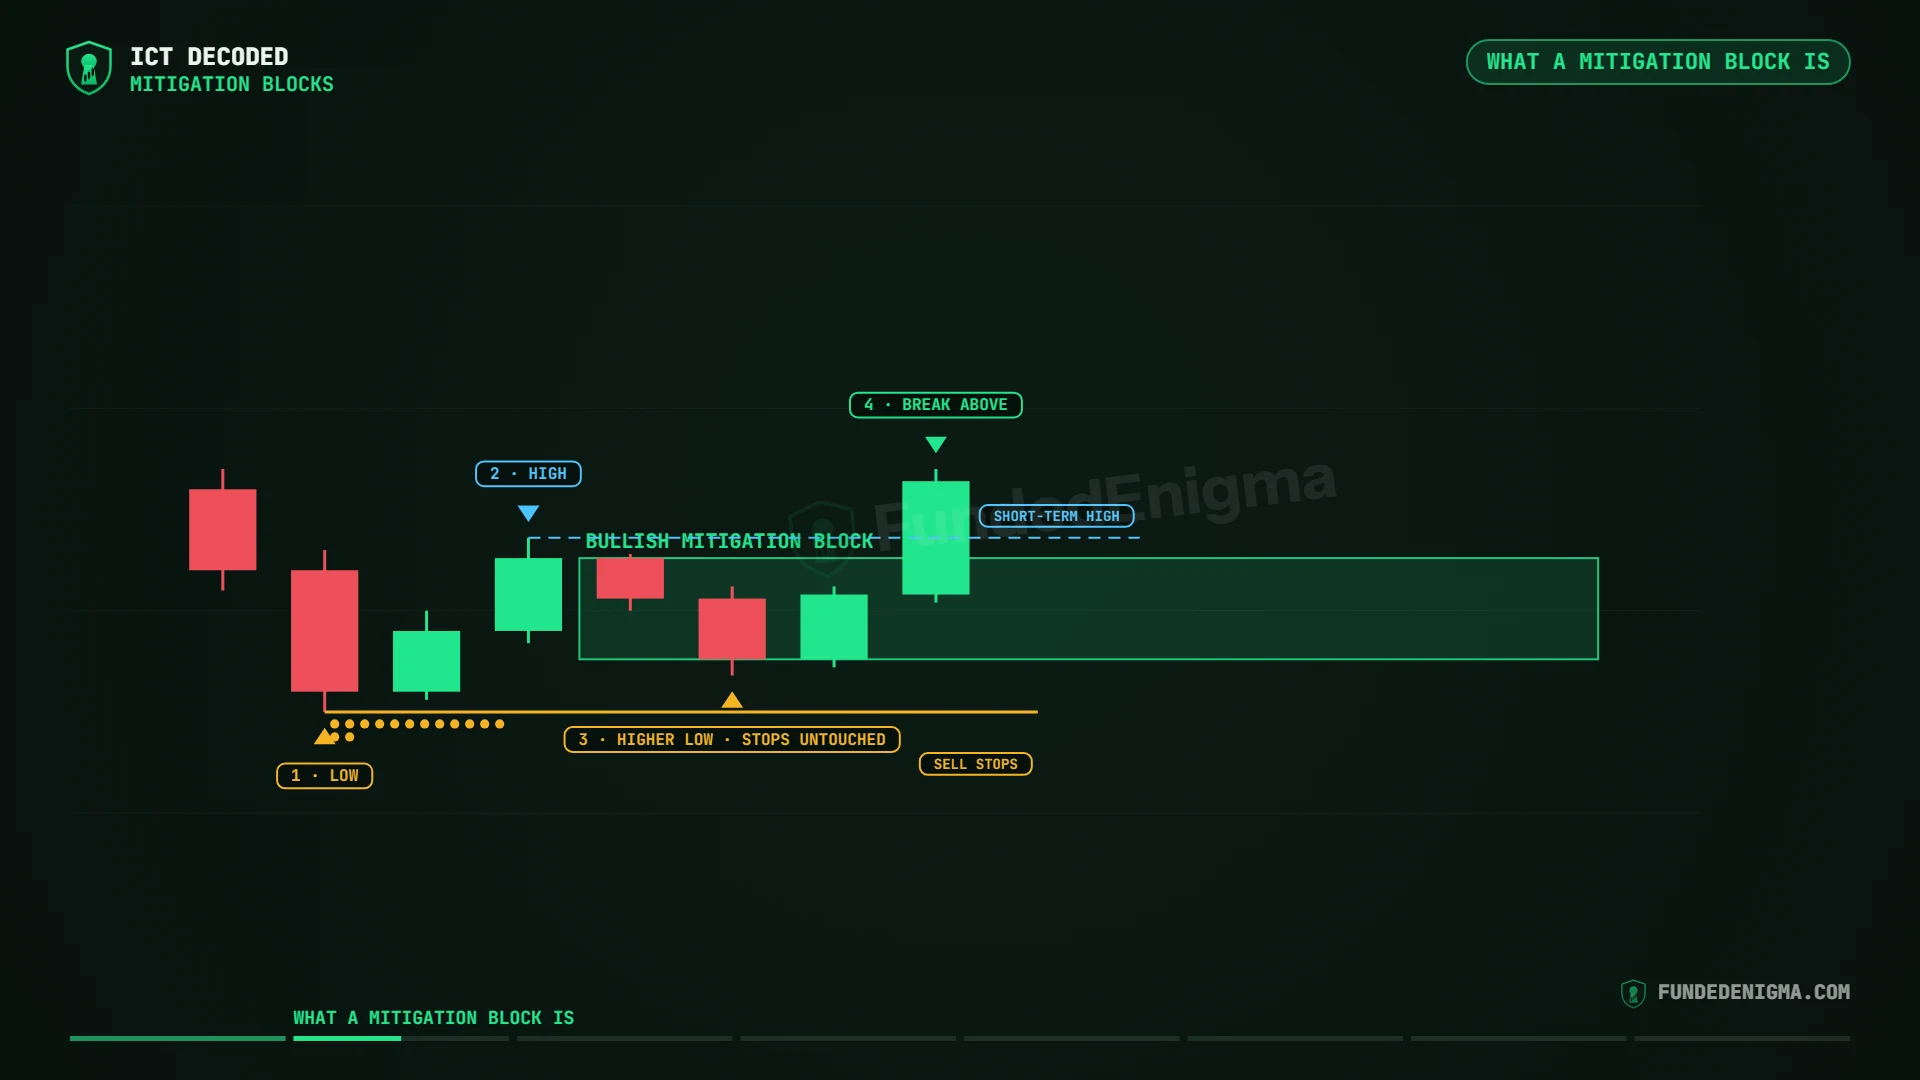
- Bullish: a W. A low, a high, then a higher low that never reaches the sell stops under the first one. When price breaks up through the high, the last down-close candles in that second low are the block.
- Why it matters: traders who sold into that second low are now on the wrong side. When price comes back, they use the return to get out near where they got in. That is the mitigation.
Bullish vs bearish mitigation block
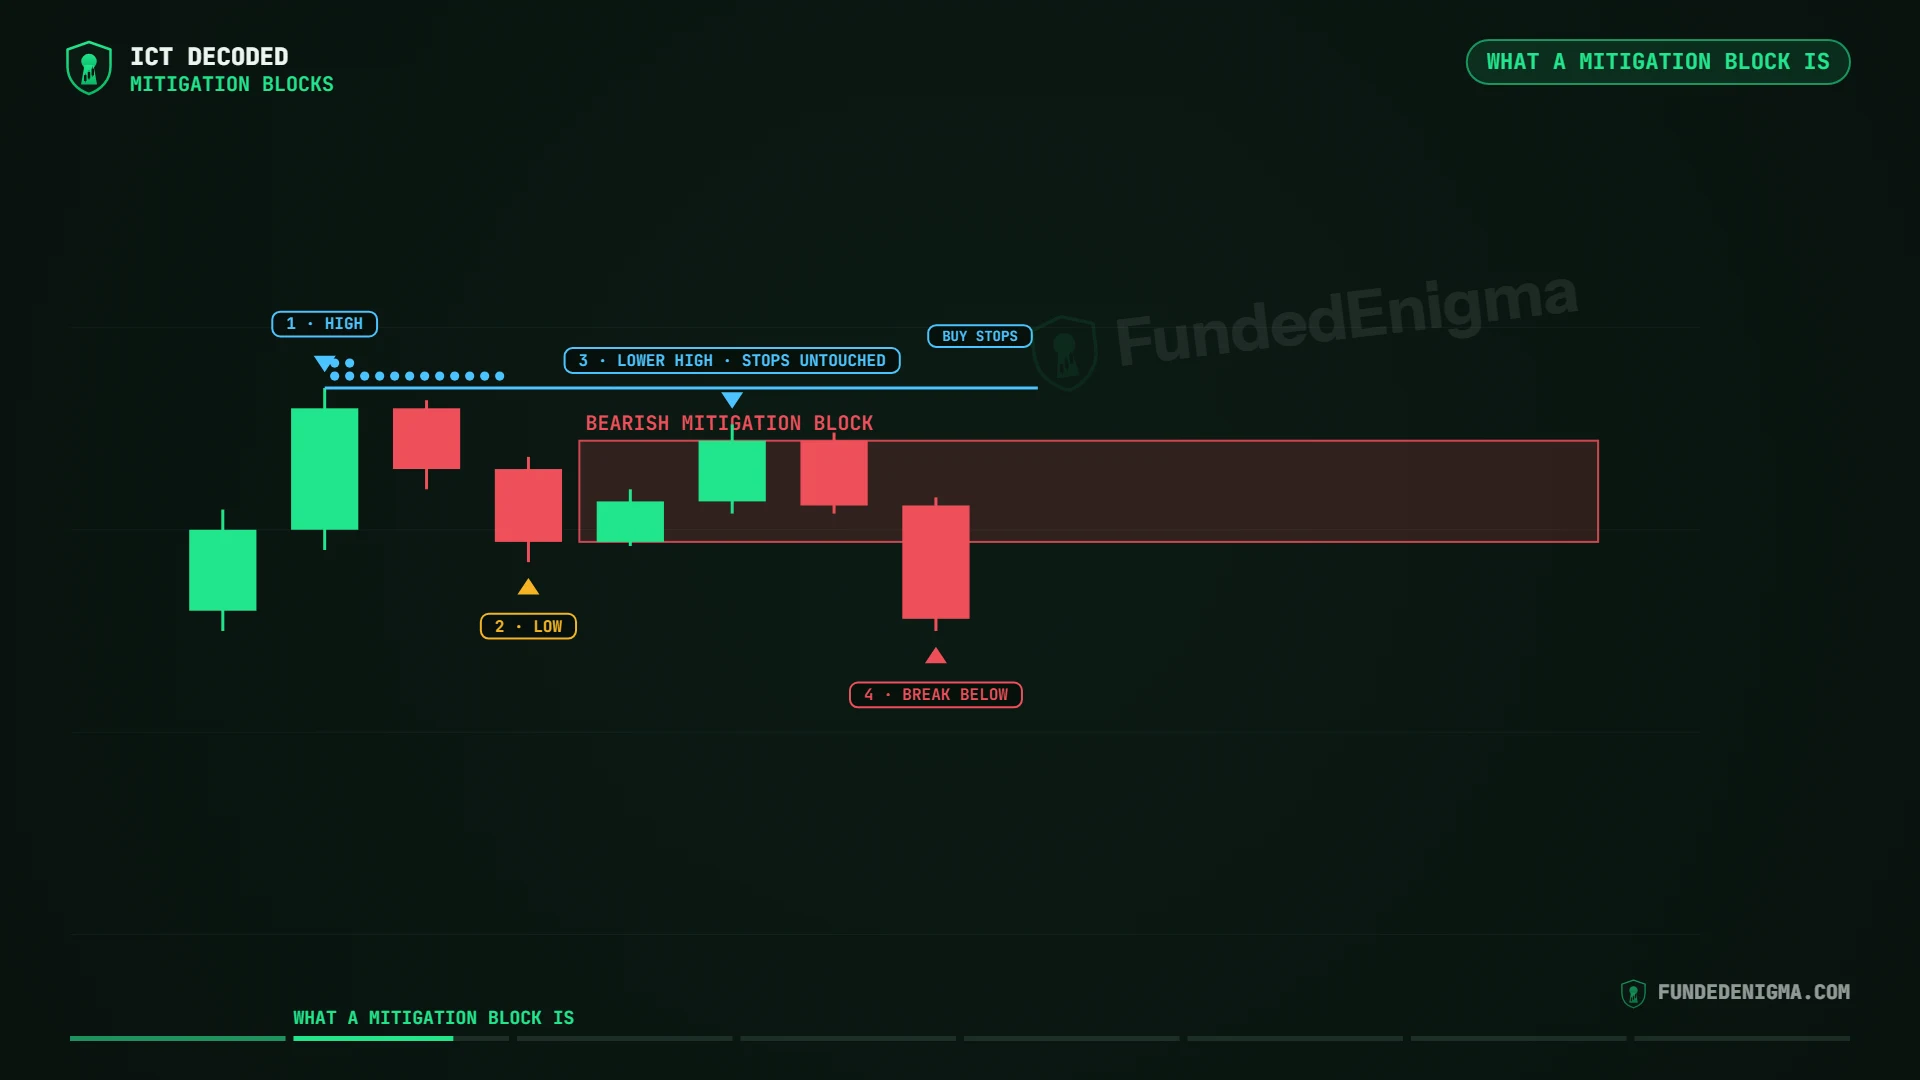
The bearish version is an M: a high, a low, then a lower high that falls short of the buy stops, then a break down through the low. The last up-close candles in that second high are the block.
Mitigation block vs breaker block: what is the difference?
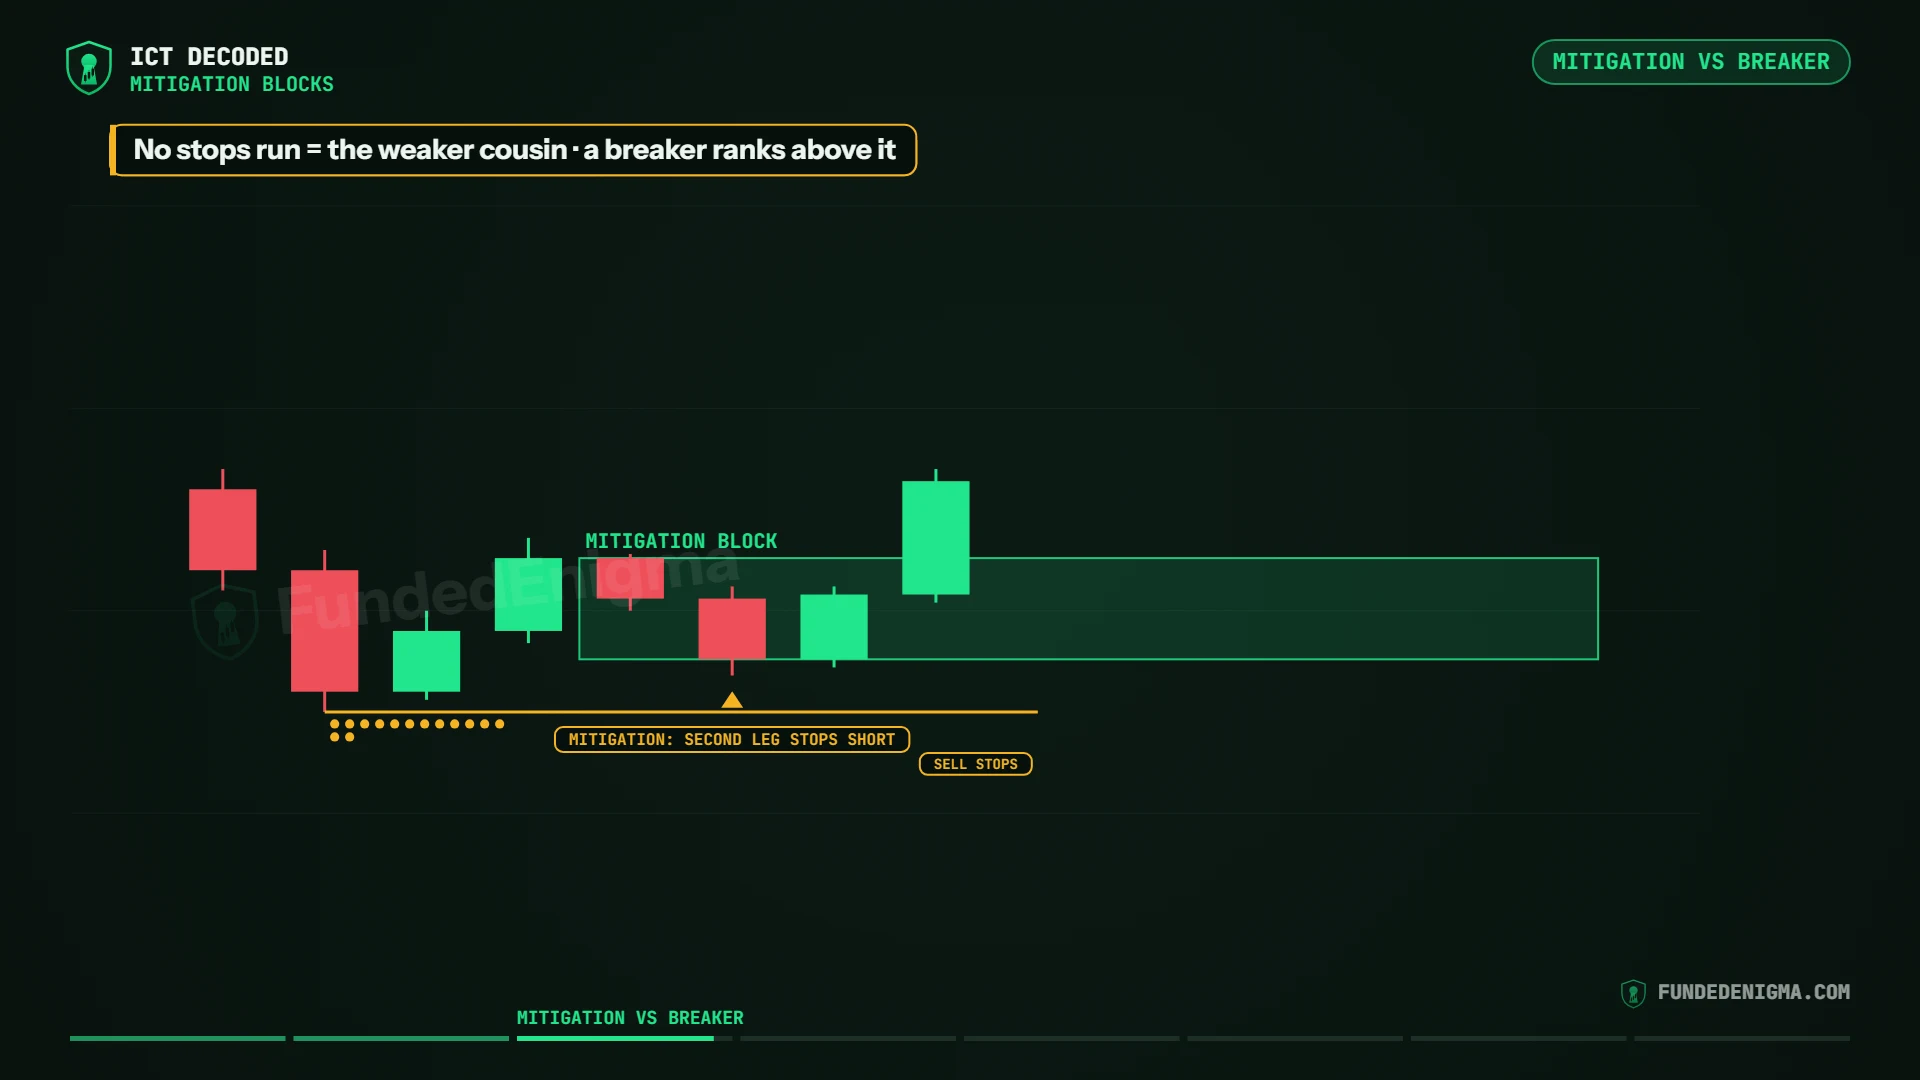
A breaker's second leg runs beyond the first extreme and takes the stops there; a mitigation block's second leg stops short. Because no stops were run, the mitigation block is the weaker cousin. When you weigh the two, rank the breaker above it.
How do you mark a mitigation block?
Frame it the same way as an order block or a breaker: bodies, from the highest open or close in those candles to the lowest. Then mark its 50%.
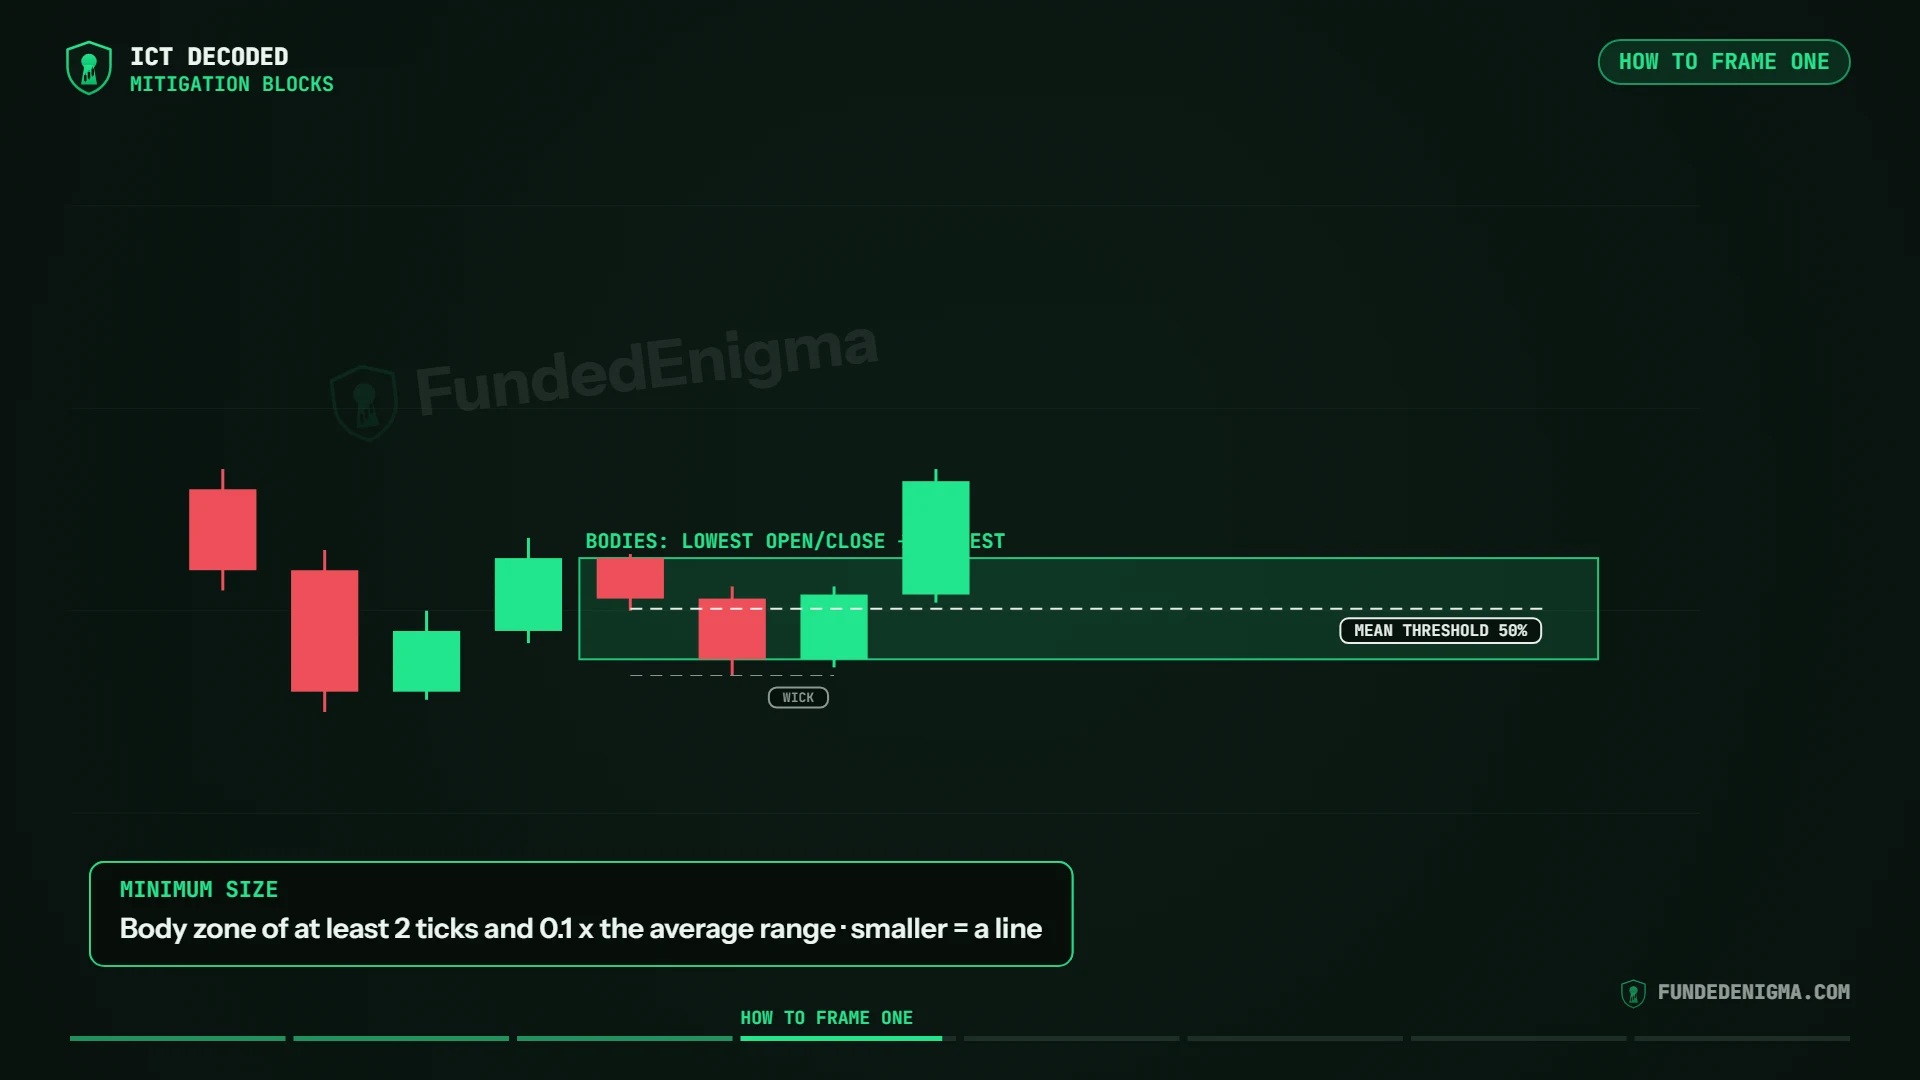
- Keep the wicks for reference only. The block's edges are the bodies.
- The mean threshold is the 50% of the bodies.
- Keep a minimum size. A body zone under 2 ticks, or under a tenth of the average candle range, is a line, not a zone.
How do you spot a mitigation block?
Three checks: the second swing stops short of the first, price breaks the short-term swing between them, and there is an opposite-close candle in that second swing to frame.
- No stops taken. The second low holds above the first low (or the second high below the first high). See liquidity.
- The break. Price trades through the short-term swing between the two; the clearest version closes through it. See market structure.
- The candles. The last down-close candles in the second low (or up-close candles in the second high). Consecutive ones blend into one block.
When is a mitigation block invalid?
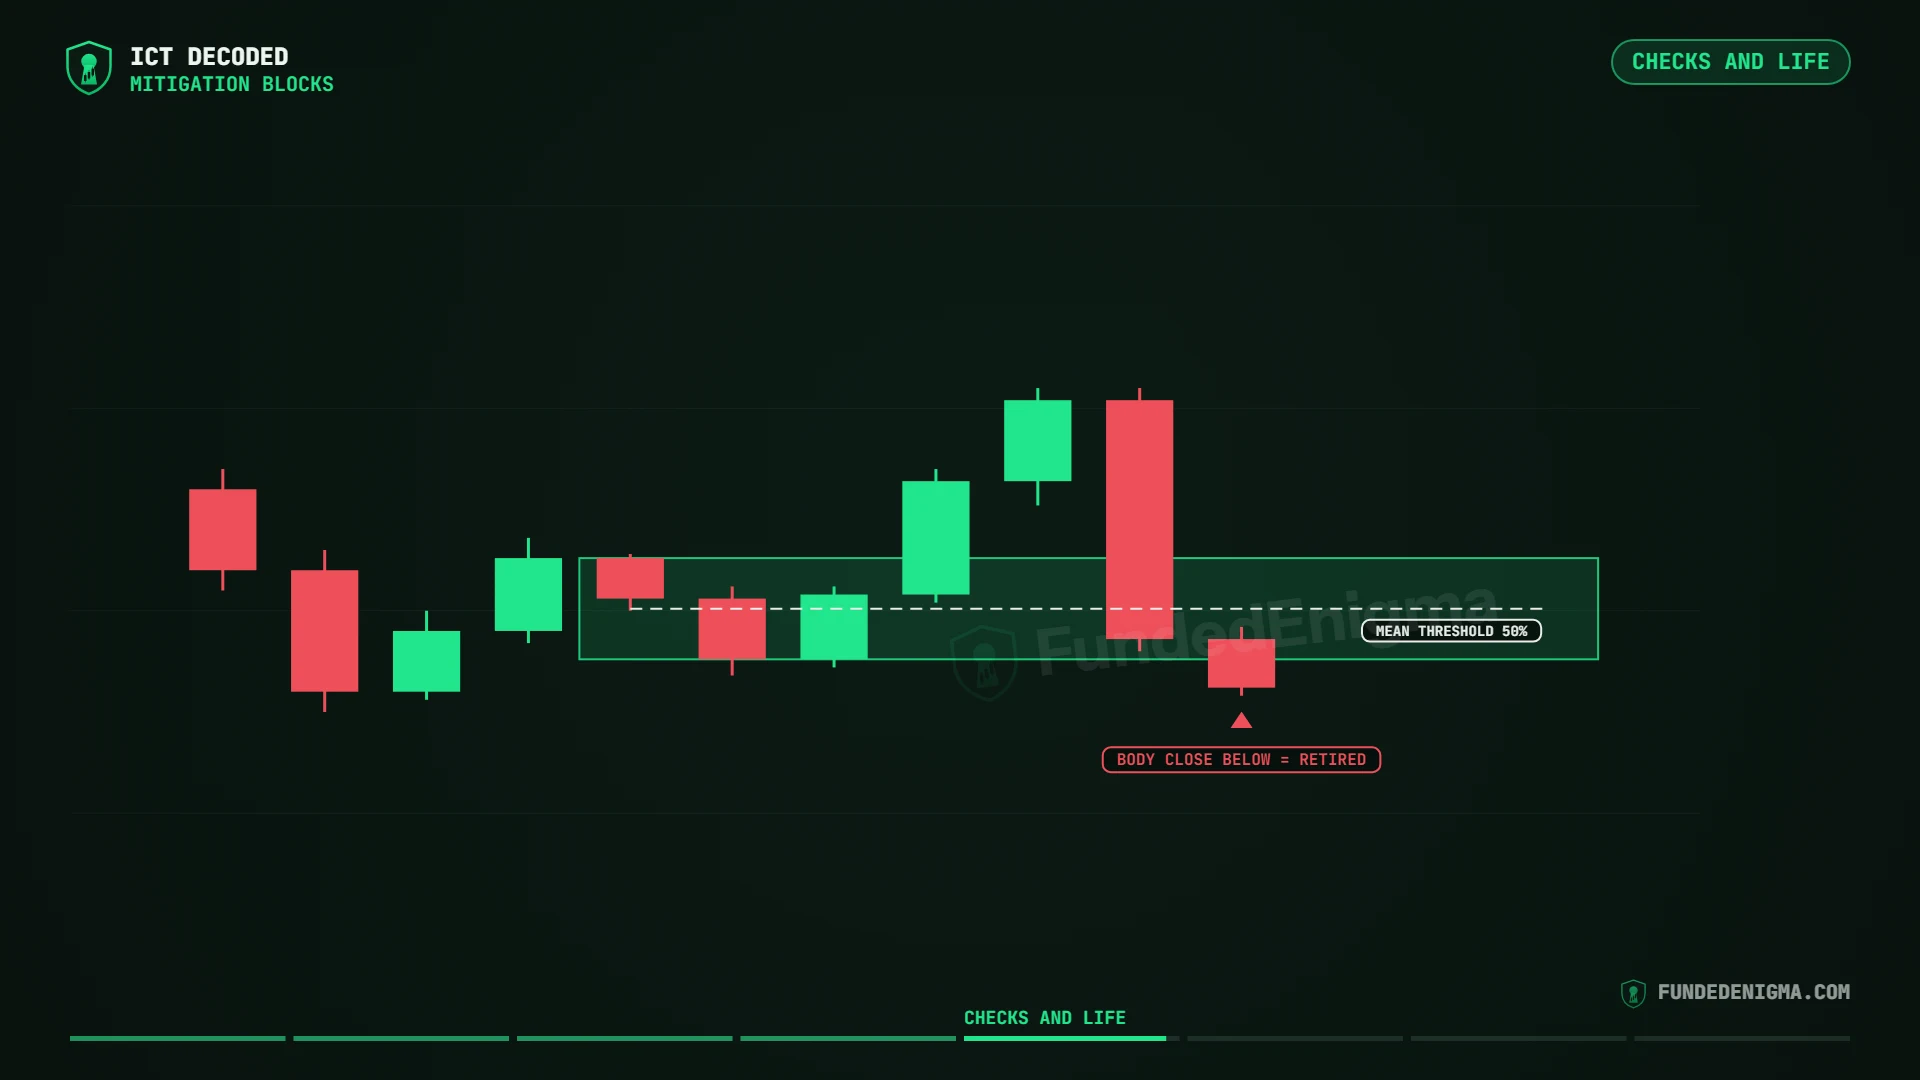
When a candle body closes beyond its far side: below the bottom of a bullish block, or above the top of a bearish one. Wicks into the block are normal.
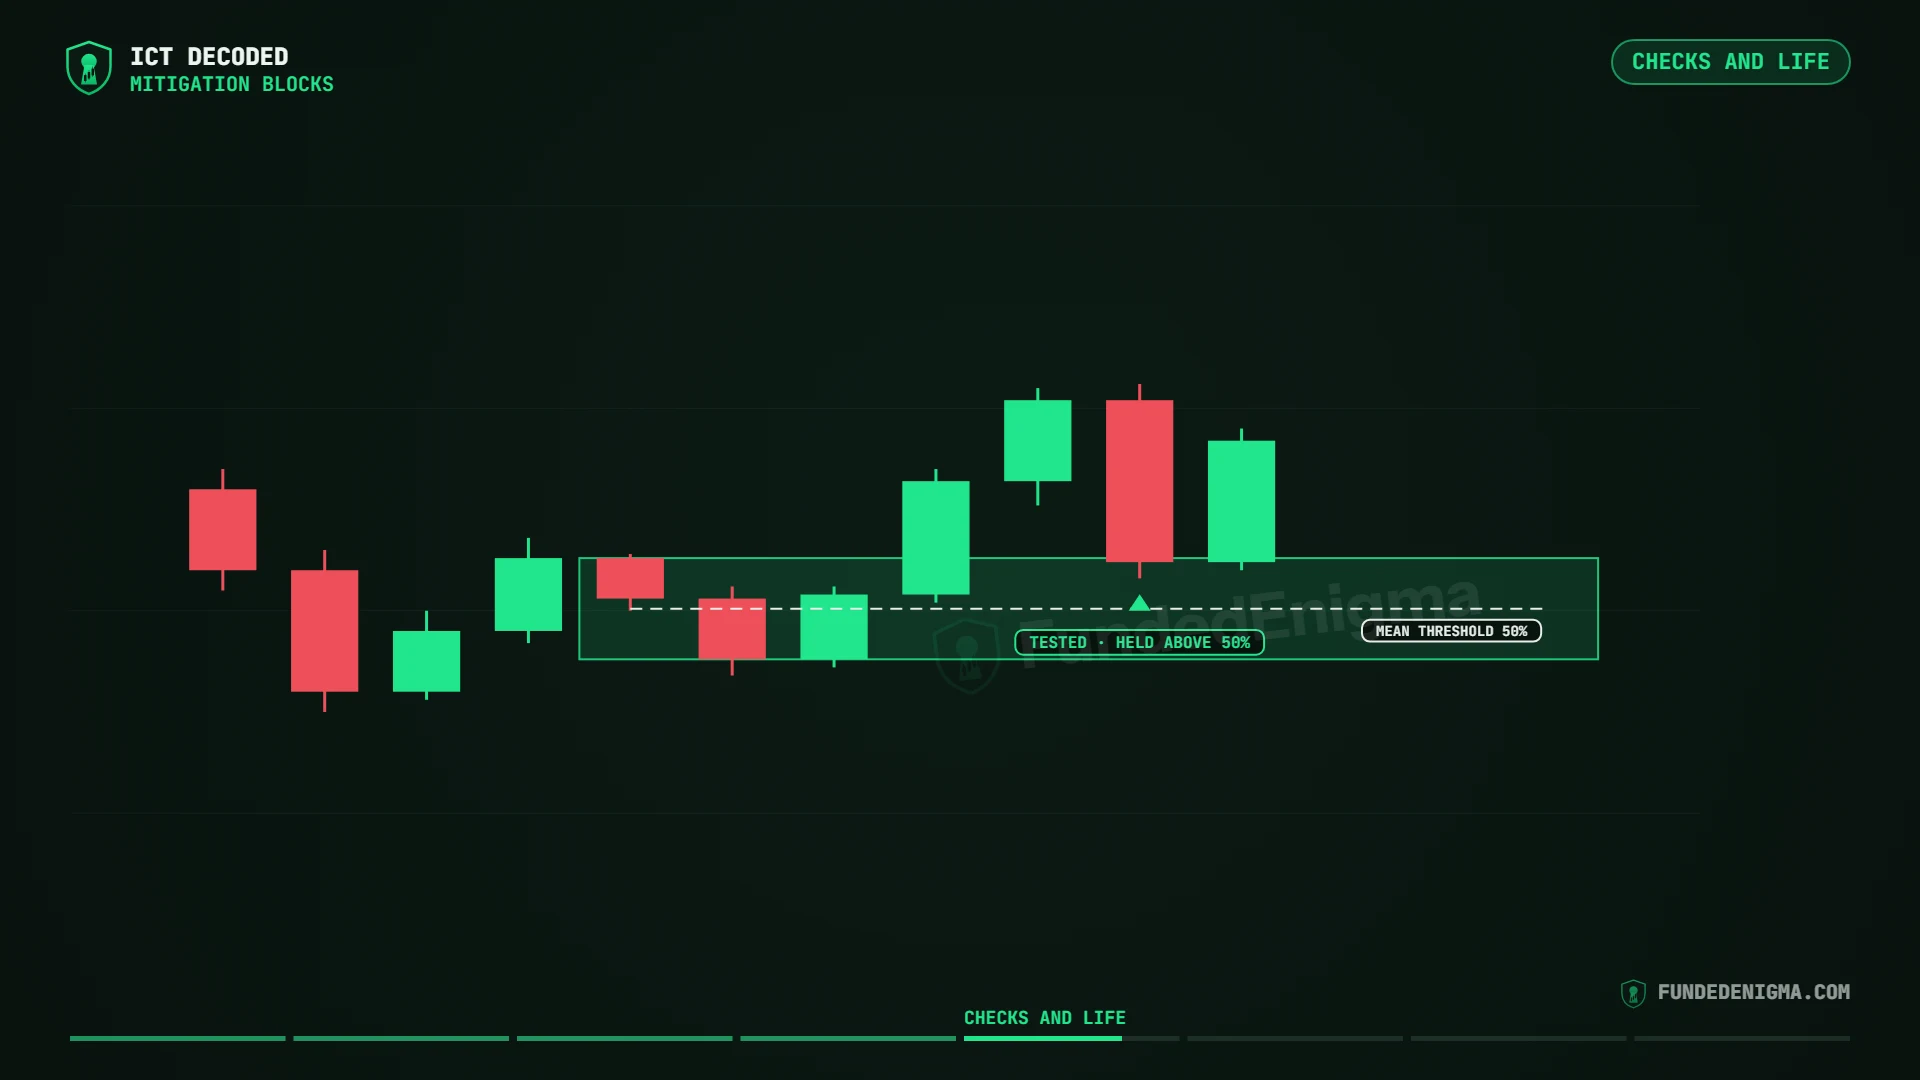
- Fresh: price has not come back to it.
- Tested: price trades into its near edge.
- Mean threshold: price reaches the 50% and has worked through its middle.
- Retired: a body closes beyond the far side.
What do mitigation blocks look like on real charts?
A bullish block that price dipped into and held, and a bearish block that price returned to twice without a body close back inside from 10:00, both on the 15-minute chart.
Example 1: a bullish mitigation block, NQ 15-minute, September 22, 2026
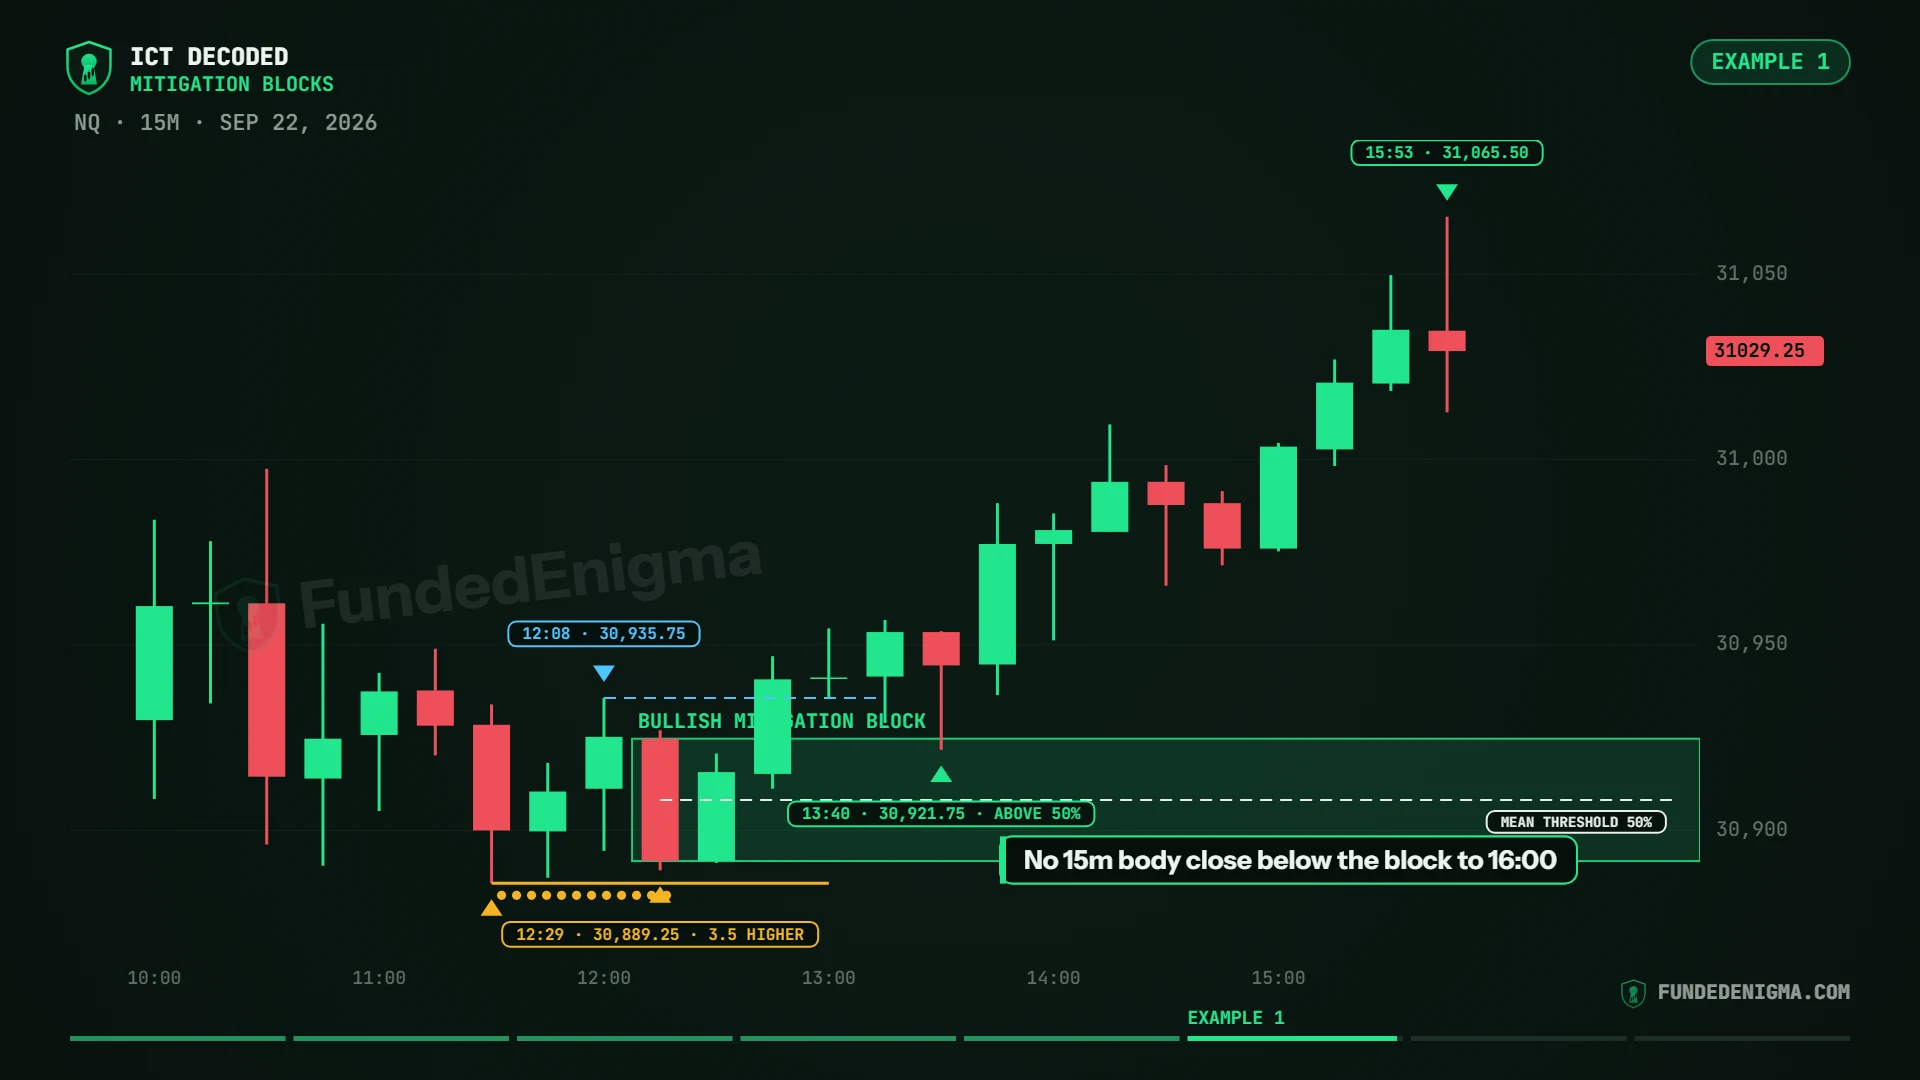
- At 11:41 price makes a low at 30,885.75. It bounces to a short-term high of 30,935.75 at 12:08.
- Then the dip. The 12:15 candle closes down, and at 12:29 the low is 30,889.25: 3.5 points above the first low. The sell stops under it stay untouched that session.
- At 12:48 price trades above the 12:08 high, and the 12:45 candle closes above it, at 30,940.75. The 12:15 candle is now a bullish mitigation block: its body runs from 30,891.75 to 30,924.75, with the mean threshold at 30,908.25.
- At 13:40 price dips back to 30,921.75: just inside the top of the block, well above its middle. It holds.
- Through the 16:00 close no 15-minute body closes below the block, and at 15:53 price reaches 31,065.50.
Example 2: a bearish mitigation block, NQ 15-minute, March 27, 2026
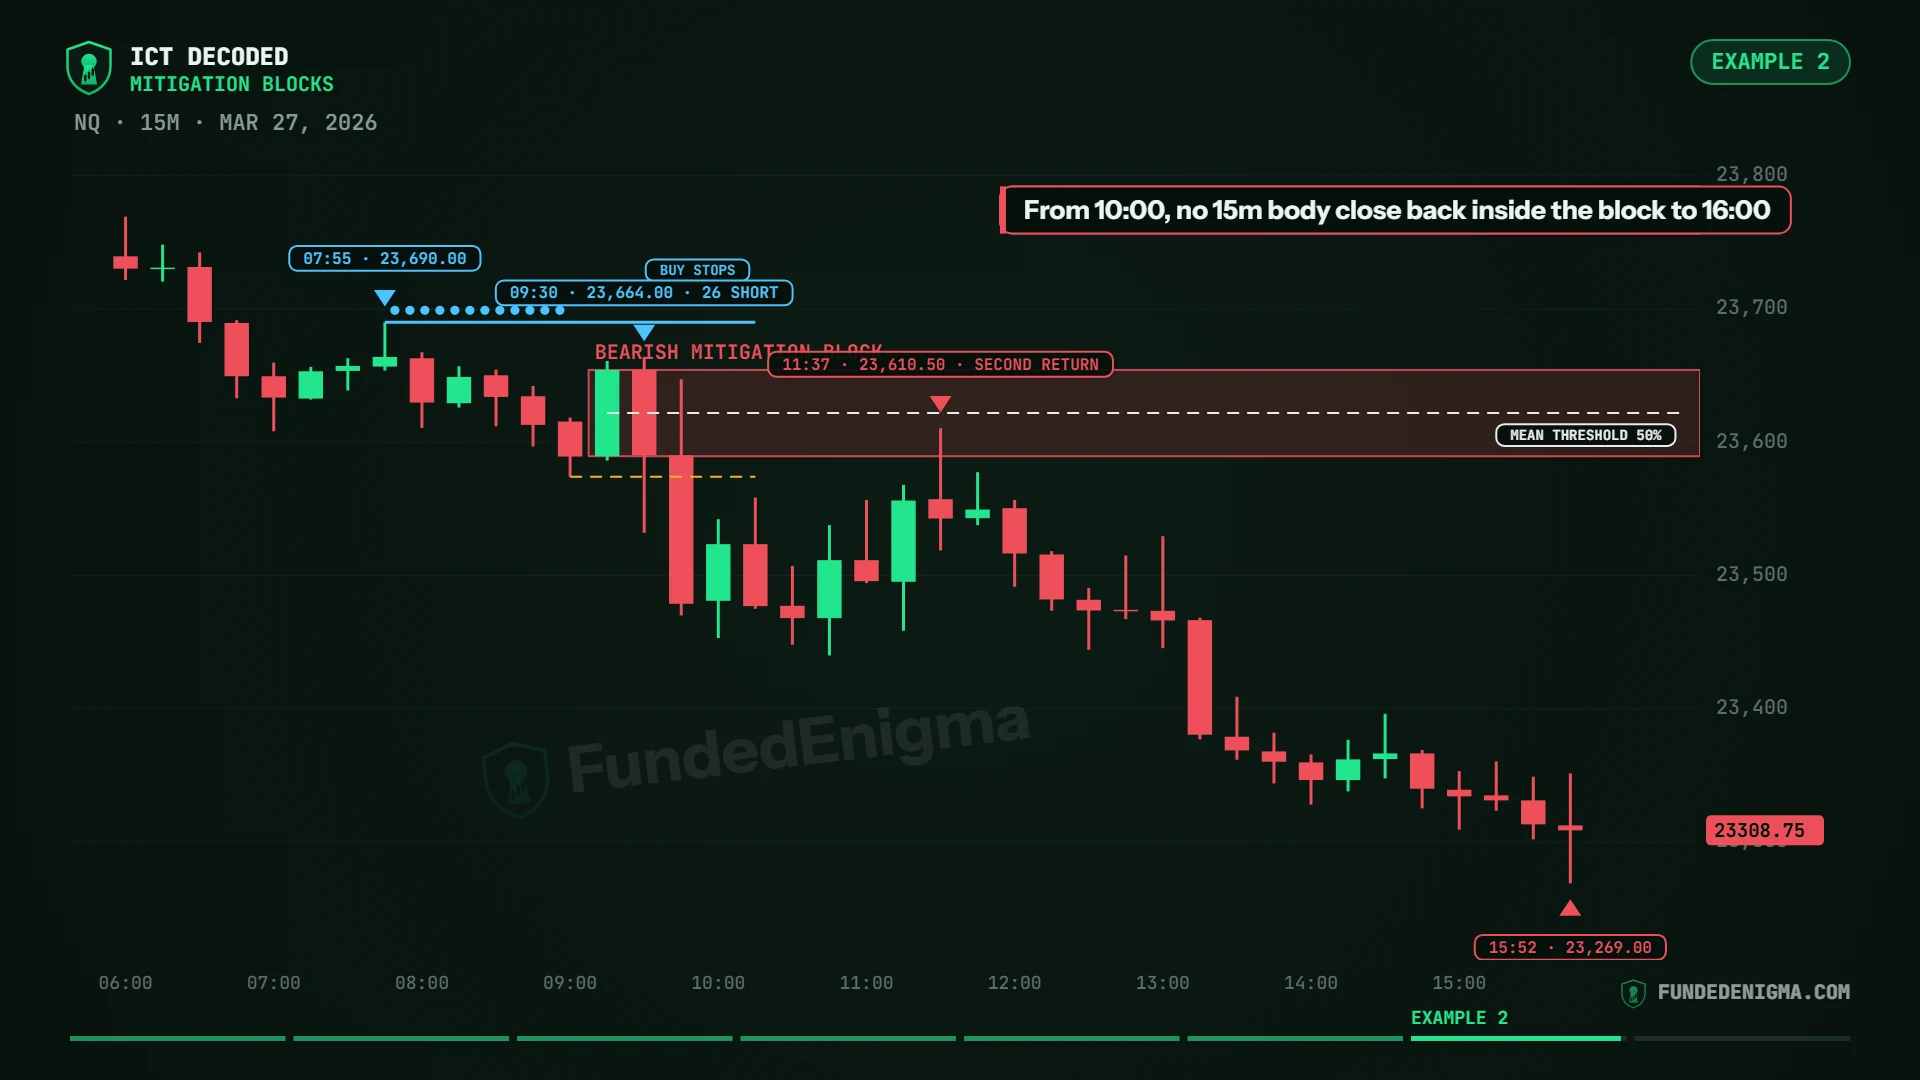
- At 07:55 price makes a high at 23,690.00. By 09:10 it is down at 23,574.00.
- The 09:15 candle closes up, and at 09:30 the rally tops at 23,664.00: 26 points short of the first high, so the buy stops above it stay untouched.
- At 09:34 price trades below the 09:10 low, and the 09:45 candle closes well under it, at 23,478.75. The 09:15 candle is now a bearish mitigation block, from 23,589.50 to 23,654.25, with the mean threshold at 23,621.875.
- Price snaps straight back into the block at 09:48, up to 23,647.25, past its middle. Then it falls to 23,440.00 at 10:46. At 11:37 a second pullback reaches 23,610.50, short of the middle.
- From 10:00 through the 16:00 close no 15-minute body closes back inside the block, and at 15:52 price is down at 23,269.00.
How do you use mitigation blocks in your own charting?
Treat a mitigation block as the weaker cousin of a breaker: a zone to watch, framed by its bodies and judged by the closes.
- Say which block. Name the timeframe, both body edges and the mean threshold.
- Check what was not taken. No stops were run at the second swing; if they were, call it a breaker instead.
- Rank it below a breaker. When both appear, the breaker counts for more.
- Watch the closes. Wicks into it are normal; a body close beyond the far side ends it.
More concepts in the series are on the ICT Concepts Decoded hub. If you trade futures with a prop firm, you can look up a firm's rules on the challenges page or set two firms side by side on the compare page.
Frequently asked questions
Does a mitigation block need a liquidity sweep?
No. That is the difference from a breaker: the second swing stops short of the first, so no stops are taken.
Is a mitigation block stronger than a breaker block?
No. Because no stops were run, it is the weaker of the two; rank the breaker above it.
Do you mark a mitigation block with bodies or wicks?
On this page, with bodies: from the highest open or close in the candles to the lowest. The wicks stay on the chart for reference only.
What if several candles make up the second swing?
Consecutive opposite-close candles in that swing blend into one block, framed from the highest body edge to the lowest.
Which timeframe should I use for mitigation blocks?
The timeframe you are reading. The examples here use 15-minute blocks; say the timeframe whenever you name one.
How do you trade a mitigation block?
This page does not give trade signals. It shows how to recognise a mitigation block, frame it and follow its life by the closes.
Sources
- Concept: mitigation blocks and the mean threshold as taught by ICT (The Inner Circle Trader, Michael J. Huddleston), who originated these terms. The explanation, examples and charts on this page are our own.
- Data: every chart is real historical CME Nasdaq-100 E-mini (NQ) futures data, shown in New York time.
- Video: How to Spot a Mitigation Block (And Why It's Not a Breaker) | ICT Explained, FundedEnigma.
Last verified: 2026-10-31. Written by Steve H.
Disclaimer: This page is for education only and is not financial advice. Trading futures involves substantial risk of loss. Past price behaviour does not guarantee future results.
Related ICT concepts
- Reading Candles: Open, High, Low, Close and Wicks: How to read a candle the ICT way: open, high, low, close, the order they print in, expansion, reversal and indecision candles, and the wick's 50%, on three real NQ sessions and 4,195 sessions of data.
- Dealing Ranges and Average Daily Range (ADR): What an ICT dealing range is, how to measure average daily range (ADR), and what 4,175 NQ sessions and 473 New York mornings say about each, on three real NQ charts.
- Phases of Price: Consolidation, Expansion, Retracement, Reversal: The four ICT phases of price (consolidation, expansion, retracement, reversal) with a testable rule for each, two real NQ sessions and what 527 days of 15-minute data say about each phase.
- Top-Down Analysis: From the Daily Bias to the Five-Minute Chart: ICT top-down analysis with one job per timeframe (daily bias, one-hour structure, five-minute timing), two real NQ sessions and what 1,264 five-minute shifts say about lining the timeframes up.
- The A+ Entry Checklist: ICT's Setup in Order: ICT's A+ entry checklist as seven checkable boxes, two real NQ sessions and what 1,919 five-minute setups say about ticking more of them.
- The Silver Bullet: ICT's One-Hour Window: ICT's Silver Bullet defined so it can be checked, two real NQ mornings and what 1,534 days say about whether the 10 to 11 AM hour matters.
- Breaker + FVG (the Unicorn) and the Box Setup: ICT's breaker + FVG pairing and the box setup, defined so they can be checked, four real NQ mornings and what 2020-2026 NQ data says about each.
- ICT's Son's Model and the Twitter Model: ICT's son's model and the Twitter model, defined so they can be checked, four real NQ mornings and what 2020-2026 NQ data says about each.
- Broadening Formations: ICT broadening formations defined so they can be checked: 15-minute, daily and session versions on real NQ charts, and what 2020-2026 NQ data says.
- Trading Without a Structure Break: Reading a raid before the market structure shift, defined so it can be checked: three real NQ mornings and what 2020-2026 NQ data says about the early read versus waiting for the shift.
- Stops, Sizing and Trailing for Prop Accounts: Stops placed where the idea is wrong, sizing by a fixed risk, and what tighter stops, trailing and losing runs looked like on 2020-2026 NQ data, for a prop account's drawdown limit.
- News and the Economic Calendar: Filtering the economic calendar, ICT's idea of news as the catalyst, three real NQ release days and what CPI, jobs-report and Fed days did on 2020-2026 NQ data.
- Why Traders Fail with ICT (and the Fix): Why traders struggle with ICT: the busy chart tested on 2020-2026 NQ, boxes drawn for no reason, losing streaks in one fixed rule, and how to make your trading measurable.
- Currency Futures and the Dollar Index (6E, 6B, DXY): 6E, 6B and the dollar index explained, why a forex pair is a fraction, and whether picking the pair from yesterday's daily candle worked on 2010-2026 daily data.
- EURGBP for Relative Strength (EURUSD vs GBPUSD): EURGBP as a live gauge of relative strength between EURUSD and GBPUSD, two real New York mornings, and a test of whether it tells you in advance.
- Internal vs External Liquidity: Where pullbacks stop and where the next leg goes: the back and forth between old highs and lows and fair value gaps.
- Market Structure: Read the trend from swing highs and lows, and tell a real change in trend from a pullback.
- Protected and Relevant Swings: Rank swing highs and lows, see how a swing becomes protected, and focus on the relevant ones.
- Market Structure Shift: Spot the turn: a stop raid, then displacement through the swing that started the last push.
- MSS vs Liquidity Grab: The wick shows the stops were taken; the close and what follows show whether price meant it.
- Premium, Discount and Equilibrium: Split the dealing range at its 50%: longs in discount, shorts in premium.
- Optimal Trade Entry (OTE): The 62-79% band of a clean leg: where to look on a pullback, with a reason inside it.
- Fair Value Gaps (FVG): Three candles that don't overlap: mark it wick to wick and judge it by the closes.
- Inversion Fair Value Gaps (IFVG): A gap a candle body closed through: it can flip sides, and where it forms decides if it matters.
- Order Blocks: The last opposite-close candles before the shift: frame them with bodies and only count them after a sweep, a shift and displacement.
- Breaker Blocks: An order block that failed after a sweep: frame the candles of the broken swing with bodies and judge them by the closes.
- Propulsion Blocks: An order block built on an order block: a candle dips into a fresh order block, holds its middle, closes back out, and a close beyond its open makes its body the block.
- Change in State of Delivery (CISD): A body close back through the open of the run that made the high or low: the first sign that the other side has taken over.
- Killzones and key times of day: ICT's windows of the day in New York time, Asia, London and New York, plus the key opening times: when to look, not which way to go.
- Daily bias: Which side of yesterday's range today is more likely to reach, read from yesterday's candle, with yesterday's 50% as the line to respect.
- Intraday bias: The daily bias read on the four-hour candles: which side of the last candle's range the next one is more likely to reach.
- Power of three (AMD): Accumulation, manipulation and distribution: the range, the wick and the body of a daily candle, and how to check a manipulation.
- Standard deviation projections: Which leg to measure, the -1, -2, -2.5 and -4 marks, when they are void, and how often NQ actually reached them.
- Inducement: The small swing high or low in front of a zone, why price runs it on the way in, and whether it helps the zone hold.
- SMT Divergence: When NQ and ES disagree at the same level, what that one-sided sweep says, the confirmation to wait for, and how often it held.
- High vs Low Resistance Liquidity: How to read the path between price and a pool: a clean path left by a fast move, or a crowded path of defended highs, and why distance matters more.
- London Reversal Daily Profile: The ICT London reversal daily profile: London runs one side of the night and turns, New York continues. Rules, real NQ sessions and how often it held.
- New York Daily Profiles: Three ICT daily profiles where New York turns the day: the New York manipulation, the New York reversal and seek and destroy, with real NQ sessions and how often each showed up.
- Weekly Profiles: Classic Expansion and Midweek Reversal: Two ICT weekly profiles, the classic expansion and the midweek reversal: which day makes the weekly wick, three real NQ weeks and how often each showed up.
- Weekly Profiles: Consolidation Reversal, Intraweek Reversal, Thursday Counter and TGIF: Four ICT weekly profiles, the consolidation reversal, intraweek reversal, Thursday counter and TGIF, on four real NQ weeks and 731 weeks of data.
- Draw on Liquidity: Which high or low price is most likely to reach next, and two simple reads to pick the side.
- Liquidity: Where stop orders rest above highs and below lows, and how price runs from one pool to the next.
- All ICT Concepts Decoded lessons (the series hub)
- The ICT Concepts Decoded playlist on YouTube
Keep learning
- How prop firm drawdown works
- How to pass a prop firm evaluation
- Trading futures with a funded account? Futures prop firms ranked and side-by-side comparisons